WP Invoice Settings Main tab
This page covers the settings found under the “Main” tab on the WP-Invoice settings page. These include basic and more advanced functionalities like business data, styling settings, tax handling etc.
Business Settings
These settings will define how your business data appears on invoices, quotes and PDF invoices.
- Business logo: You can upload your logo. It will appear on the invoices and quotes you send.
- Business Name: Enter your business name here. This field defaults to the blog name you chose during WordPress’ installation.
- Business Address: Enter your business address here. It will appear on the invoices and quotes you send.
- Business Phone: Enter your business phone here. It will appear on the invoices and quotes you send.
- Email Address: Enter your email address here. It will appear on the invoices and quotes you send.
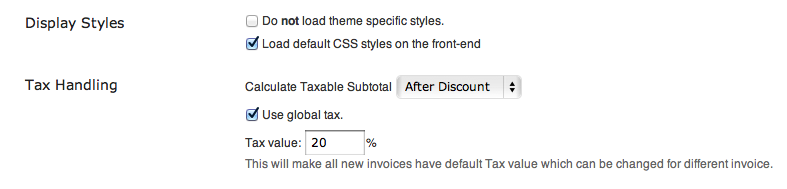
Display Styles
Here you can set, enable or disable the WP-Invoice default style settings. Only change the default values if you are an advanced user who understands CSS styles and is able to create their own stylesheets.
- Do not load theme specific styles: WP-Invoice includes specific CSS files that make invoices look good on the default Twenty Ten, Twenty Eleven and Twenty Twelve themes. If you check this box, the specific stylesheets for the default themes will not be loaded. Advanced users can create their own stylesheets for their themes using the css files located in wp-invoice/core/theme-specific.
- Load default CSS styles on the front-end: If this is checked then the default WP-Invoice styling (included in wpi-default-style.css) will be used on the front-end to display invoices. Only disable it if you are and advanced user and want to style invoices on your own.
Tax Handling
Here you can set when tax calculation is done (depends on your country’s fiscal system) and you can define a global default tax.
-
Calculate Taxable Subtotal: Choose “Before Discount” to be taxed on the invoice total before discount is calculated or “After Discount” to be taxed on the invoice total after discount is calculated. Default value is “After Discount”. By calculating the Taxable Subtotal before discount, your client gets billed the same amount but you pay more taxes. For example, on an invoice with a total of $100, with 10% discount and 20% VAT we would have:
- After Discount: Total is $100 - 10% = $90 so the amount you will be taxed would be 20% of $90 = $18 and your client will be billed$90 +$18 = $108.
-
Before Discount: Total is $100 so the tax amount would be 20% of $100 = $20 while your client will be billed the same ($120 - 10% = $120 - $12 = $108)
- Use Global Tax: If checked a field appears in which you have to set a global tax value. This tax will be applied by default to all invoices and is helpful with situations in which you only use a specific tax amount for all or most of your invoices. You can still change the invoice-specific tax when you edit your invoices.
 ***
***
Advanced Settings
These settings control advanced features that have to do with billing, installation features, design issues and general actions for administrators and developers.
- Allow Partial Payments: If this box is checked then you can allow clients to pay a part of the total amount of their pending payments. Note: The partial payments system does not appear if minimum allowed payment on any invoice is greater than the invoice’s balance.
- Partial payments allowed by default. This option will enable Partial payments by default while creating invoices, but you will need to set up Minimum Payment on each single invoice settings.
- Show recurring billing options: If checked, recurring billing options appear in the publish metabox when you are creating or editing an invoice. Only check it if you are interested in accepting recurring payments from your clients.
- Enforce HTTPS on invoice pages: Only check this box if your have enabled HTTPS (encryption) on your server and wish to force HTTPS encryption on the invoice pages. If you have no idea what HTTPS is better leave it unchecked.
- Minimum user level to manage WP-Invoice: Created for multi-user sites. Sets the minimum WordPress user level that is necessary for a user to be able to change WP-Invoice settings and create / edit invoices. If you do not allow registrations on your site you can ignore it, although it is recommended that you set it to “Administrator”.
- Using GoDaddy Hosting: If you are running WordPress from GoDaddy, set this field to “Yes”. GoDaddy requires a special proxy for credit card transactions that is enabled if set to “Yes”.
- Use custom templates: If checked, WP-Invoice will create a folder called “wpi” in your active template’s folder and save custom templates for invoices there.
- Install/re-install templates: If checked, WP-Invoice will attempt to install or overwrite the templates described above inside the “wpi” folder in your active theme’s directory. Useful if you have unsuccessfully tried to edit these templates and now they don’t work anymore.
- Thousands Separator Symbol Use period or comma to separate groups of thousands.
- Decimal Separator Symbol Use period or comma to indicate the decimal place.
- Show invoices only for logged in recipients. For those you who not logged in will be displayed 404 page.
- Send passwords to newly created recipients. If you are using new email while creating invoices, new recipient(New User) is creating on your site. You can send them credentials to their accounts on your site after invoice created.
- Turn off compatibility mode. By default the Compatibility Mode is on. If you encounter problems displaying your invoices then turn it off.
- Add “Terms & Conditions” checkbox to regular invoices. This option allows you to add “Terms & Conditions” checkbox to your regular invoices. Be sure you have specified Terms page ID.